Git学习笔记
Git学习笔记 by 《ProGit》
Git设计理念
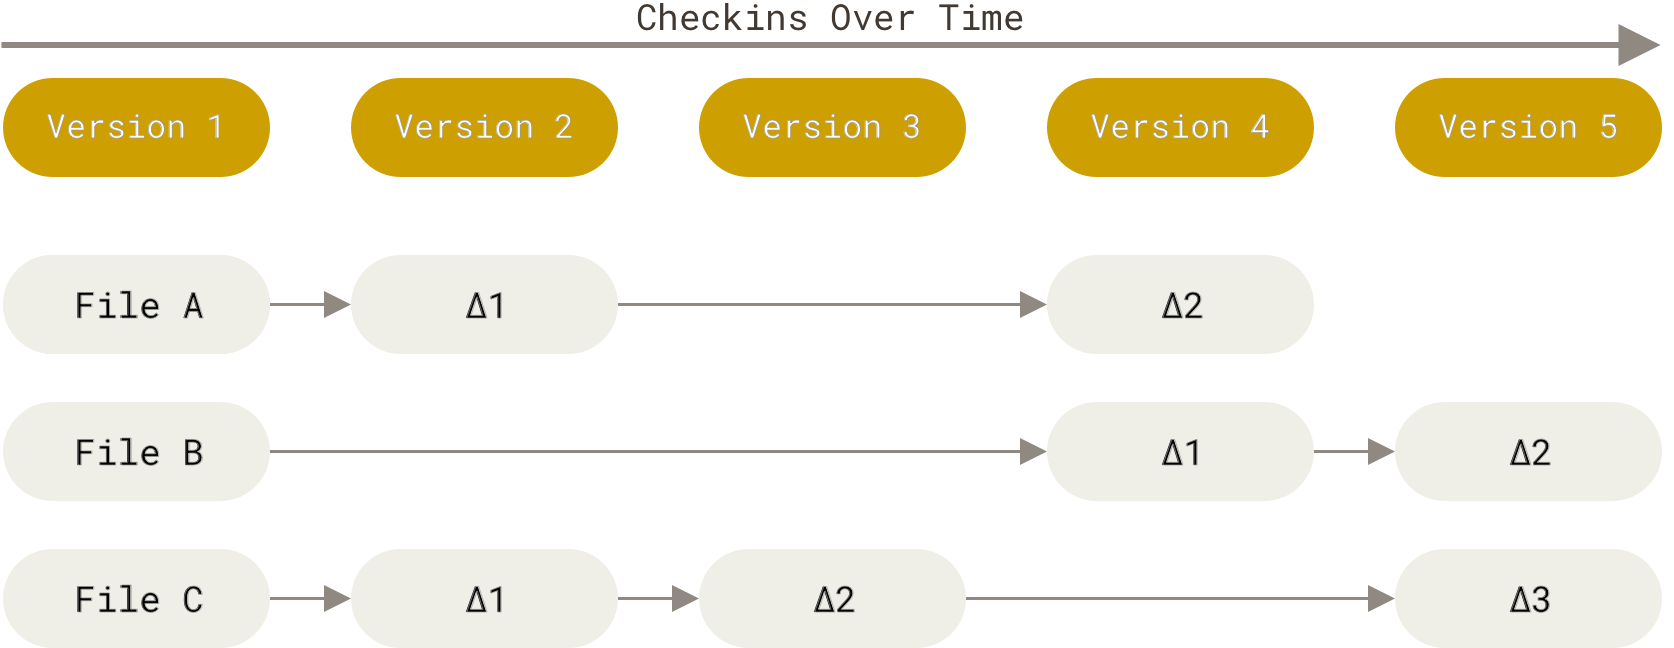
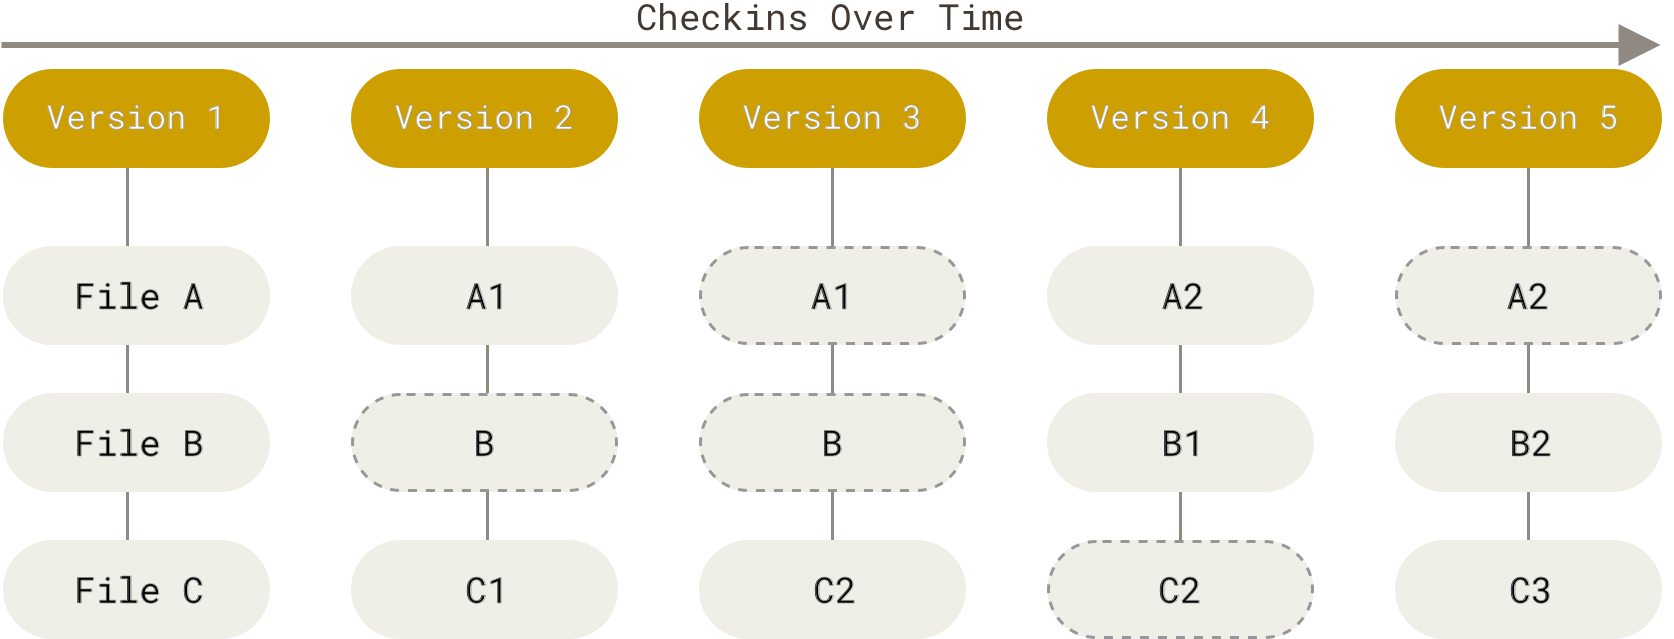
Git直接记录快照,而非差异比较
基于差异**(Delta-based)** , 像CSV、Subversion、Perforce。它们如何建立新版本:在版本1的基础上,建立一个记录
版本2(新版本)与版本1差异的文件,我们称其为$\Delta1$ .当我们需要读取版本2时,可以通过**$版本1 + \Delta1$** 计算得出版本2。Git快照流,提交后,建立一个新的快照:对修改过的文件建立一个新的快照并保存其索引,对未修改的文件并不重新存储,而是只保留一个链接指向旧文件
Git 基础
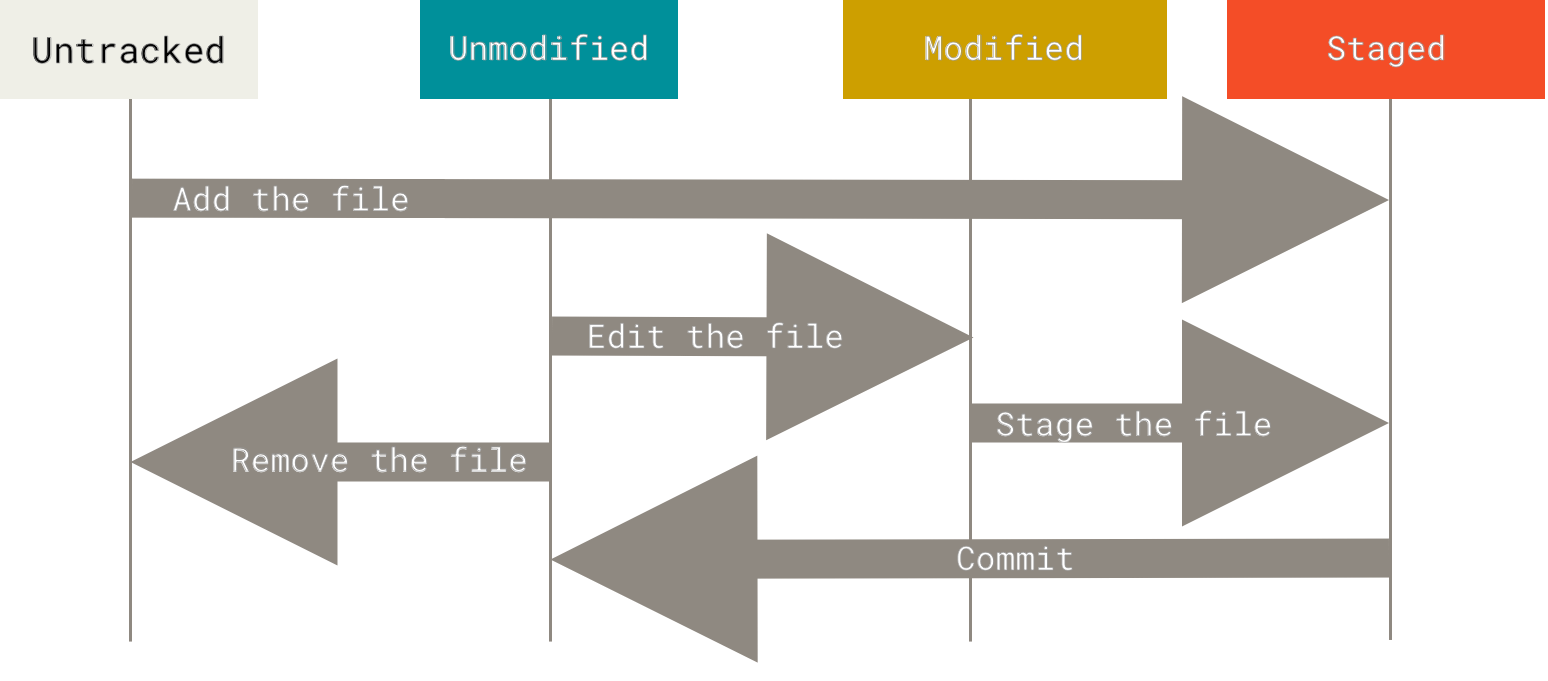
Git工作状态
三种状态:已提交(committed)、已修改(modified)、已暂存(staged) , 对应三个阶段:工作区、暂存区、Git目录(仓库)。

Git配置
安装Git后添加用户信息:
1 | git config --global user.name "benkangpeng" |
1 | cd /c/user/my_project |
Git基本操作
获取mannul
1 | git <verb> -h |
ex : git add -h
git init
1 | cd /my_project/ |
初始化Git仓库,此时会在my_project文件夹中生成.git子目录用于存放版本控制文件。注意:此时还没对项目文件进行跟踪 , 还需要git add跟踪所需文件。
git add
1 | git *.c # 跟踪所有后缀为.c文件 |
git add内涵:
要暂存这次更新,需要运行 git add 命令。 这是个多功能命令:①可以用它开始跟踪新文件,②或者把已跟踪的文件放到暂存区,还能用于合并时把有冲突的文件标记为已解决状态等。 将这个命令理解为“精确地将内容添加到下一次提交中”而不是“将一个文件添加到项目中”要更加合适。
git status
显示当前文件夹git状况。
On branch master
No commits yet
Changes to be committed:
(use “git rm –cached…” to unstage)
new file: README.mdUntracked files:
(use “git add…” to include in what will be committed)
CONTRIBUTING.md
如上显示的是,README.md已被跟踪,而CONTRIBUTING.md未被跟踪。
1 | git add CONTRIBUTING.md |
On branch master
No commits yet
Changes to be committed:
(use “git rm –cached…” to unstage)
new file: CONTRIBUTING.md
new file: README.mdChanges not staged for commit:
(use “git add…” to update what will be committed)
(use “git restore…” to discard changes in working directory)
modified: README.md
- 此时
CONTRIBUTING.md已经被跟踪 - 提示有
待提交的修改(changes to be committed) ,CONTRIBUTING.md和README.md没有提交。(至于changes , 即new file, git将创立文件也视为changes) Changes not staged for commit: 我们刚才向README,md写入了My project, 但没有将新版本的README.md添加进入暂存区stage。可执行操作git add README.md- 上面这条再一次体现了
git add的双重命令,或将其理解为为文件提交(commit)做好预备
.gitignore
创建.gitignore文件忽略追踪
1 | touch .gitignore |
常见语法:
1 | # 忽略所有的 .a 文件 |
git diff
git diff查看同一文件已暂存与未暂存的两个版本的差异eg. 在
README.md中添加一行哈哈,no stage , 使用命令查看:
$ git diff README.md
diff –git a/README.md b/README.md
index 6fcadd0..b2f8c83 100644
— a/README.md
+++ b/README.md
@@ -1 +1,3 @@
My project~
+
+哈哈
\ No newline at end of file
git diff --staged查看已暂存文件与最后一次提交文件的差异.
1 | git diff --staged README.md |
git commit
每次准备提交前,先用 git status 看下,你所需要的文件是不是都已暂存起来了, 然后再运行提交命令 git commit:
1 | git commit -m "the first commit" |
-m: 添加提交信息message“the first commit” : 提交的信息,区分每一次提交做了哪些大体的修改
git commit -a跳过暂存区,直接将为暂存的文件commit .
git rm
- 如果你想从磁盘根本删除
未暂存的文件:
1 | git rm PROJECT.md |
- 从暂存区删除(取消跟踪)文件(仍保存在磁盘里):
1 | git rm -f PROJECT.md #-force , 强制删除 |
git mv
git mv移动文件 or 重命名文件。
1 | git mv Project.md PROJECT.md |
上述命令相当于:
1 | mv Project.md PROJECT.md |
git log
git log显示所有提交日志git log -2显示最近两条日志git log -p按补丁格式显示每个提交引入的差异git log --pretty=oneline显示格式为一行- 此外还有一些参数过滤日志内容,例如
--since``--author等,可查文档。
git commit –amend
- 提交后发现上一次提交有些许瑕疵,例如message写错了、没有跟踪上某个文件 ,但又不想再一次提交,想覆盖上一次提交。
1 | git commit --amend -m "the right message" |
git reset
- 强制重置(删除)某个commit, 例如
git reset --hard HEAD~1删除上一次提交。 - 取消暂存的文件,例如将
CONTRIBUTING.md文件取出``stageing area,git reset HEAD CONTRIBUTING.md`
git rebase
git rebase命令是用于解决开发者仓库与上游upstream仓库之间同步问题的命令。

以TVM为例,你fork完tvm后,提交了两个commit,在此期间,tvm upstream又更新了两个commit,这时如何将你的commit贡献给上游呢?
1 | git fetch upstream #将上游仓库更新到本地,但不合并(与git pull不同) |
git rebase的工作流程:
如果git rebase发生冲突,则需要手动解决冲突,并:
1 | git add <conflicit file> |
*文件版本回溯
案例:commit log如下,自从git clone以来,我提交了version 1和version2.整个项目只有两个文件:check.md和README.md. 我现在想将check.md还原到version 1的状态,但README.md不用还原。(可以理解为我后知后觉意识到version2中对check.md的修改是错误的。)
$ git log –pretty=oneline
bc03ee1185c084b514ff44a9520ab5d29777b600 (HEAD) version2
3d44a28a78ffba2eab8d0718e34c3f7463cfa2a1 version 1
86d413d821c361c0245859fddd9c6258f698f16f (tag: v1.0, origin/main, origin/HEAD) colle
ct some ways to github
1bfa40c95f5b2a5a086421889e60321ef056fbc0 (tag: v0.1) the first commit by git push
a41ee579c6756e653d380b2e08426ea74f77841d (tag: v0.0) Create README.md
1 | git reset 3d44a # 3d44a是version1的效验码,没写完整 |
但以上做法删除了version2的提交信息。是否存在方法,只进行单个文件的版本回溯呢?现在还没解决……
*单文件版本回溯
1 | git log --pretty=oneline |
- 将
check.md回溯到版本1,其他文件不变,git checkout <hash> check.md
1 | git checkout 3d44a28a check.md |
与远程仓库联动
git remote add <name> <url>添加远程仓库,例如git remote add getback https://github.com/BenkangPeng/GetBack.git, 之后可用名称getback代替网址进行操作。类似于C里的#definegit remote -v显示已添加的远程仓库,git remote简略显示。git remote rename name1 name2修改仓库代称,实际远程仓库(比如Github上的仓库)名称没被修改。
1 | git remote add getback https://github.com/BenkangPeng/GetBack.git |
git fetch获取仓库的更新。例如,你在1年以前clone了仓库A, 但在过去一年内,仓库A其他开源贡献者提交了许多内容,甚至产生了分支,git fetch <url>将仓库A的这些更新数据下载到本地,但不会改变本地状态:不会自动合并分支或修改你当前的工作。当然你可以手动合并分支、更新本地仓库。git clone <url>克隆仓库。将<url>对应的仓库克隆到本地,与git fetch不同的是,它将覆盖本地工作。
1 | git clone https://github.com/BenkangPeng/GetBack.git |
关于主分支 master改为main,还颇有意味。github/renaming 乐子 on 知乎
Tag
git tag -a <v1.0> -m "version 1.0"添加annotated tag,git tag v1.0添加lightweight标签。git tag显示所有标签,git show <v1.0>显示某个标签信息git tag <version> <verify code>为之前某一次commit补充tag
1 | git log --pretty=oneline |
- 默认情况下,
git push不会顺带将每一个commit的tag提交,需手动设置。git push origin <tagname>上传单个tag,git push origin --tags推送所有tags git tag -d <tagname>删除标签,但不会删除远程仓库(``remote)的tags, 需用git push origin –delete`
Git分支
1 | git branch testing #创立分支testing |
git merge <branch>
1 | git touch polynorminal.cpp |
在main中合并分支时,可能出现合并冲突,这是因为分支中文件修改过大,git不知道如何将main与branch两个文件版本合并,此时需手动合并、修改文件,并commit
git branch -d <branch>删除分支(但不能删除未合并的分支)git branch --no-merged查看未合并的分支
Git版本回溯(by branch)
我一直是用git reset --hard <hash_id>进行版本回溯,但这样会丢失之后的commit,导致版本混乱。现在想到一个方法,可以用分支来进行回溯查看。(当然,如果我们确定要回到某个commit重新工作,并确定要丢失之后的commit,也可以硬重置。)
查看当前分支
1 | git log --oneline --decorate --graph --all |
现在我们正在sparse分支上,因为改动较大,想回到稠密版本上查看稠密版本的源码:
1 | git checkout -b check_dense_version e339fae |
这时整个工作目录的文件都变成了e3319fae时的版本。在这个版本下,如果我们运行代码导致一些文件发生了修改,工作目录不干净,是不能直接switch回sparse的:
1 | git switch sparse |
提示显示如果我们要更换分支,需要commit 或者stash
- 如果我们不需要提交,可以将文件变更取消掉,再
switch
1 | git restore . #将所有被修改的文件复原 |
git stash
如果我们在sparse分支下工作目录有修改未提交,那么切换分支之前需要将修改存入stash。
1 | git log --oneline --decorate --graph --all |
git stash相关命令
git stash save [message]:将当前工作目录的修改保存到一个stash列表中,并附带一条可选的描述信息。git stash list:列出所有的stash列表。git stash apply [stash_id]:将指定的stash应用到当前工作目录,但不从stash列表中删除。git stash pop [stash_id]:将指定的stash应用到当前工作目录,并从stash列表中删除。git stash drop [stash_id]:从stash列表中删除指定的stash。git stash branch [branch_name] [stash_id]:基于指定的stash创建一个新的分支,并将stash应用到新分支上。git stash pop --index [stash_id]:将指定的stash应用到当前工作目录和索引(暂存区),并从stash列表中删除